Tuesday 28 January 2020

JuJu Densetsu repair log

Bought recently a faulty Toki PCB because I like this funny game (a bit underrated IMHO).For the uninitiated  it's a "run and gun" game developed and published in Japan by TAD Corporation in 1989.The board was in good condition :


But it played "blind", I could coin up and start a game but nothing was on the screen :


The RGB colors were inactive, stuck at LOW level :


They are generated by the custom 'UEC-51' (basically a DAC in SIL package like the Taito 'TC0070RGB') .


I have reproduced time ago this custom :

https://www.jammarcade.net/seibu-uec-51-reproduction/

Hence I know well how it works so I went to probe it and found that pin 10 was stuck HIGH :


This pin is the input for an /OE signal so it should have been active.I traced it back to an output of a 74S139 @7K  :


The logic comparator confirmed that outputs pins 11 and 12 were troublesome :


I piggybacked the chip with a good one and got displayed a correct image.At same time I found the board was actually JuJu Densetsu, the japanese release of Toki :


Obviously the chip failed the out-of-circuit testing :


The game seemed to play absolutely fine but, doing some comparison with online video, I found that some sound effects (like voices, jumps, etc)  were missing  :


These are generated by the OKI MSM595 ADPCM voice synthesis chip which plays samples taking and processing the data from an external ROM:


The EPROM was dumped fine, clock was present on the MSM6295 but all its address lines were stuck meaning the chip was dead.I replaced it and installed a spare:


All sound FXs were restored in this way.Board 100% fixed and an addictive game added to my collection!


Sunday 26 January 2020

Star Force (bootleg) repair log

Recently I've been sent a load of bootleg boards for repair, there was a Star Force  (a vertically scrolling shooter released in 1984 by Tehkan).It's a two stack set made by a CPU board :


and a VIDEO one :


Despite its age ( a sticker on CPU board says March 1985!) it was in good shape but faulty since on boot it was stuck on a static garbage screen.


Main CPU is a classic Z80 along with another same one for sound.Probing them revealed both was missing a proper clock signal on pin 6 which was stuck HIGH :


Looking at hardware and doing some tracing I quickly figured out the clock for both CPU was derived from the same circuit made by a 4MHz crystal plus the RC oscillator :


Both pin of the crystal were stuck, I traced them back to pin 1 and 2 of the near Toshiba TC40H004P which likely was faulty and forcing the crystal to not propery oscillate.I had no spare of it but, after found its datasheet, I realized it was CMOS HEX inverter :


 Hence I could replace it with a more common 74HC04 which I promptly did :


I applied power and board sprang to life, game was fully working with no issue :


Repair accomplished.


Friday 24 January 2020

Irem 'KNA6021901' reproduction

Another custom IC reproduction successfully achieved.The part in question is marked 'KNA6021901' in DIP42 package (600 mil) :


It can be found on Irem hardware like M62 (Kung-Fu Master, Lode Runner, Kid Niki and other boards) and M75 (Vigilante).It's always used in pair and, as schematics shows, it's kind of clock divider :

In order to reproduce it, as always I do, I looked at some bootlegs boards where functions of this custom are performed by common logic gates.I was able to extrapolate the equivalent circuit that then I routed to a proper board layout which came out with same dimensions of original part :
 

The testing was successful on a Vigilante PCB :


This hopefully will help to preserve more and more boards from death.

Thursday 23 January 2020

Jaleco 'NH-0074' & 'NH-0075' reproduction

Some time ago I've been contacted by John from vintagevideogames.com, he was in need of some specific parts to fix his Jaleco City Connection/Cruisin' PCB (picture taken from the net) :


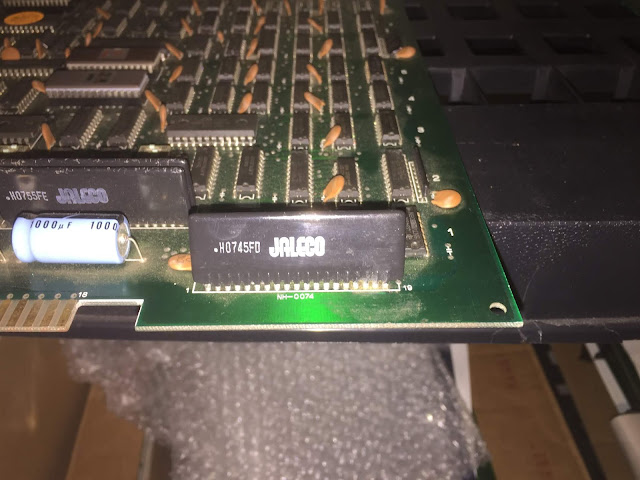
He provided me pictures of these parts, they were two black custom ICs in SIL package.A 20 pin one marked 'HO755FE' with 'NH-0075' silkscreening on PCB and a 19 pin one marked 'HO745FD' but silkscreened as 'NH-0074' :


I was asked to do a reproduction of them and and that for this task two samples would have been sent to me to be analyzed.But, as I always do, I first looked for a bootleg board to see how the functions of these parts may have been reversed.Then I remembered I had somewhere a bootleg which was a perfect copy of the original except for the fact the 'NH-0075' and 'NH-0074' were not present as ICs neither in the form of replacement PCB but their functions were integrated on the board.I studied the hardware for a bit and could identify the equivalent circuits of the two custom ICs (highlighted in the picture below) :


I also figured out the functions, the 'NH-0075' is used to drive the inputs of both players (two custom ICs are present on PCB indeed, one for each player) while the 'NH-0074' is basically an RGB DAC.With this info in my possession I started my reproduction job.Being not complex circuits I quickly drawn schematics and came to a proper board layout for both :


Project files were sent to the manufacturer and boards received after some time.Here is how they looks populated with their parts :


The reproductions were sent for testing on hardware and after some time I received the news they were both working like the original custom ICs.John provided me some pictures as proof :


Thanks again to John from vintagevideogames.com for everything and long live to arcade!  

Saturday 18 January 2020

Reviving suicided Gaelco PCBs : The Right Way

Most of arcade enthusiasts/collectors know what 'suicide battery' means.It's the term used to describe a small battery found on some arcade PCBs.The battery powers a RAM that hold a decryption table which is needed to decode program code so when the battery runs out, the contents of RAM is lost and hence game can no longer run.Many arcade manufacturers used suicide batteries in their games  like Sega, Capcom and others too.In this small guide I will explain how to properly revive suicided boards manufactured by Gaelco, a small spanish company.This is the list of boards that currently can be revived:
  • World Rally
  • Alligator Hunt
  • World Rally 2
  • Touch & Go
  • Maniac Square
  • TH Strikes Back
  • Glass
  • Target Hits
Hardware uses a Dallas  DS5002 MCU (in QFP package) as protection, which has up to 128k of battery-backed RAM containing a program for the DS5002 to execute :
 

This program actually patches main CPU's code. If the battery dies, the DS5002 no longer makes the correct patches and the game won't run. Typical symptoms of a dead battery are a "COPROCESSOR NOT READY" message :


Until some time ago it was possible to revive only World Rally since Gaelco itself released the code of this game to be re-injected onto the DS5002 MCU.Then two smart guys, Peter Wilhelmsen and  Morten Shearman Kirkegaard, devised a way to back-up DS5002 firmware of all boards via FPGA, this is the original document explaining their work:

Backing Up Firmware from Dallas Semiconductor DS5002FP

Some time ago I tried to desuicide a TH Strikes Back but I falied using the standard procedure hence Peter Wilhelmsen himself kindly explained me how to correctly perform it.Taking as example TH Strikes Back if you look at the MAME source:


 https://github.com/mamedev/mame/blob/4e089ae32e8335034b2412a2d478e278fd29832d/src/mame/drivers/thoop2.cpp#L332


You will see: DS5002FP_SET_MON( 0x79 ) which means the special register MCON is set to 0x79 (lowest bit signifies if protected/locked or not), MCON is responsible for partitioning of code/data boundaries.
I will not cover here the preliminary setup on how to connect the PCB to a PC via RS232 or USB to UART adapter, there are many tutorials on the net.
Working on the terminal program on your PC these are the steps to repair most boards that does not use the entire memory as code (like World Rally 1)  :

  1. 'U' command (without quotation marks) to unlock the MCU.The game should answer ''UNLOCKED'
  2. 'L' then upload/paste the intel hex file. 
  3. 'W MCON <value>' (for TH Strikes Back 'W MCON 79') to write the special register
  4. 'R' to read the status of NV SFRs, you should see MCON now set to 78 (lowest bit not set because its not yet locked) 
  5. 'Z' to lock the MCU

A big thanks again to Peter Wilhelmsen for his work and precious help.Thanks to him now we are able to revive our boards.

And a posthumous thanks to his friend/collegue Morten Shearman Kirkegaard who sadly passed away some months ago :


Farewell Morten Kirkegaard


This little guide is dedicated to his memory.

Tuesday 14 January 2020

Volfied repair log

I has this Volfied PCB since many years (IIRC I got it in a trade) and never looked at it before:


The board was in good state but it gave a solid black screen.Upon a quick inspection I found the reason, the 'TC0070RGB' module was missing , probably someone took it (removed in a neat way I must admit) in order to fix another board :


Not having a spare I opted to use a reproduction of mine :

 
 The board booted up and game was fully playabe but sound was distorted and corrupted :


Using an audio probe I figured out that sound came out clean from the YM3014 DAC but then it reached the input of the main amplifier (Fuitsu MB3731) already corrupted.In the middle there are two OP-AMPs : a dual one uPC4556 and a quad TL074 :


Usually when I troubleshoot analog sound issue I'm not one for subtlety hence I replaced the two OP-AMPs straight away :


This restored a correct sound.Repair accomplished and another board added to my growing collection.


Sunday 12 January 2020

X-Men repair log

Received from Portugal this Konami X-Men PCB (four players version )


Upon a quick inspection I realized the board was missing many parts.Specifically :

- The '051550 custom SIL (used for generating the master /RESET and  for coin counters/lockouts handling)

 One '005273' custom resistor array (used for inputs handling)


 A 74ALS04 @11H :


A 32K x 8-bit static RAM @2D (used for sound)


Lastly, there were deep scratches in the area of the '053251' custom ASIC as if some heavy object had fallen on the board :


Normally you would have given up to repair a board in such conditions but it's a good game plus I have an high success rate on this Konami hardware being familiar to me.So I fitted the missing components one by one :


Then I patched all the severed traces but at same time I had also to replace the '053251' ASIC because some pins were irreparably damaged :


After all this work time came to power the board up.I was quite surprised that everything seemed to work fine at first glance.I started a game and graphics, controls were good but sound was very faint even at highest volume setting:


Obviously the culprit was always him, the 'infamous' '054544' hybrid audio module :


I could have replaced it with a reproduction of mine but I tried to change all the surface mounted electrolytic capacitors on top :


And this was enough to restore a loud and clear sound!Evil Konami defeated again, see you to next chapter of this endless battle!